One part of the aquarium hobby will remain constant throughout the flow of time. Tanks need heaters. The problem? Heaters can look intrusive or down right ugly, lowering the appeal of our in home aquariums. To combat this companies have been scrambling to make new, effective ways to heat tanks safely without breaking the bank.
After a lot of niche products such as the tiny circular Betta heaters cam the emergence of the inline aquarium heater. Out of the tank, highly efficient and finally affordable, inline aquarium heaters have come in to finally butt out the long lasted rule of stick heaters.
How Do Inline Aquarium Heaters Work?
The concept behind these heaters is a fairly simple one. The water passes through a pipe/tube to reach either your canister filter, sump or refugium. After the water has finished there it passes on to the return pump. On the way back up water passes through the inline aquarium heater and has its temperature raised. This process continues until the water has reached the right temperature. After that the heater shuts off and acts as an adapter between the return line and canister filter/sump/refugium. Simple and effective.
So What Makes The Best Inline Aquarium Heater?
Ever since the evolution from stick heaters to inline aquarium heaters the world of aquatics has been drastically changed. The main things we look for in our inline heaters are:
- Precise temperatures
- Easy to use
- Efficient heating elements
- Long equipment life
Any heater filling all of those categories is more than suited for even the most spectacular aquariums the world has to offer.
Being able to maintain our water at the perfect temperature without having to introduce a distracting metal or glass stick heater is a big plus. Without the sight of equipment in the tank we create a much more realistic enclosed ecosystem. There’s no distractions, just aquatic life and their habitat.
Easy to use and long life both fulfill the same need. If the inline aquarium heater is nearly impossible to set up or cannot stay set up long then it is of little use to us. While it may seem as though a difficult set up shouldn’t be an issue you will be needing to remove the heater for some reason or another. Typically this is for maintenance on the return line of the heater or replacing the line to make it a different length. Either way if it was hard to set up the first time when we have instructions in hand the device becomes next to useless years later when we lose the instructions or forget what the item was called.
Reaching that point requires the long life of the best inline aquarium heater. As to be expected with much nicer and newer equipment, inline aquarium heaters often run more expensive than normal stick heaters. If they died every year or two there would be no way to justify the extra price point. No matter your budget wasted money is wasted money. Because of this we need a heater with at least two years of life time, with longer always being better.
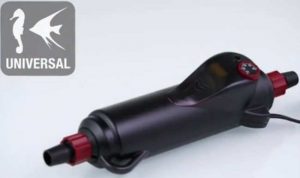
Hydor Inline Aquarium Heater
As the top inline aquarium heater, Hydor really hit all of our marks. This inline heater:
-
- Protected by a solid two year warranty, guaranteeing a life of over two years, typically three at the least
-
- Temperature settings that stick within 1 degree of the chosen setting
-
- Highly energy efficient
-
- Can often heat tanks up to 125 gallons in size
- Is highly durable and has a strong grip on its connections
Coming in with either 200 or 300 watts, this inline heater is meant for bigger tanks. Granted it can be used for smaller tanks I don’t think it’s possible to justify the use on such small tanks. The 200 watt comes in both 1/2″ and 5/8″ connection sizes while the 300 is set to 5/8″ size. These tubing can usually be found at any hardware stores, but like most cases the best prices are found online
Installation
installing they Hydor inline aquarium heater is a straightforward but non flexible task. Begin by shutting off the water flow of whatever it is you are connecting the heater to. While this is not necessary I find it a lot easier to work with pipes that aren’t pouring out water.
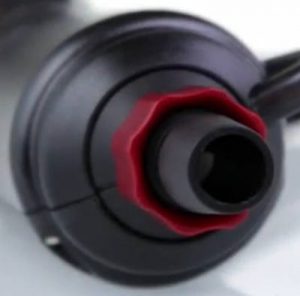
I like to install the output portion of the inline aquarium heater first, as the return line will give it support while you do the rest of the work. It’s also a heck of a lot easier, as the tube that fits the heater is perfectly suited to being the return line. Simply slide the tube over the output end of the external aquarium heater and then turn the red knob to secure the tubing in place.
A neat trick I learned awhile back is that if your tubing is a bit too small to fit over the heaters connections you can remedy the issue by simply place the tubes end in hot water for a little under a minute. This expands the tubing, allowing you to set up the heater before it contracts, giving you one of the strongest connections possible.
With the return line set up you will need to put it into its final position where it will sit for years. This can be any set up you want, ranging from a tube hanging in the water all the way to a full drilled tank.

As for the other end you will need to connect your return line to the input portion of the heater. This is where a bit of research comes into play. For the easiest installation you will want to find out what size tubing you have been using. More often than not it will be a size that the heater is inherently compatible with. If however you need an adapter be sure to order this ahead of time. It’s no fun to get a new piece of equipment just to have it sit around.
Connect the tubing from your water pump into the bottom of the inline aquarium heater or adapter and then screw it into place with the red knob.
With all the connections complete you will need to set your heater in its final resting place. Keeping the heater vertical is essential. If you keep the heater on its side or upside down it will collect bubbles in the temperature control, preventing the heater from stopping at the right time. This is often a one way ticket to boiled fish.
Once the inline aquarium heater has been built into your return line you can switch back on the water flow. The heater itself does not need to be on yet as water can freely pass through anyways. In fact it is always best to allow your heater to adjust to the aquariums temperature before switching it on. Once the heater has settled in you can plug in the heater and set your desired temperature.
Maintaining The Temperature
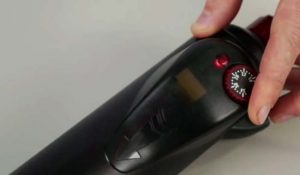
To set the temperature there is a knob located near the bottom of the heater. Turning it to the left will lower the setting while turning to the right will raise it. The desired temperature setting should be left to rest next to the red light/arrow. The settings can range from 62-94 degrees Fahrenheit.

This is where my years of paranoid living may come in handy for you. Because aquariums can be so costly I always install my heaters with an aquarium heater controller. While most of the best aquarium heaters can be trusted, one malfunction is all it takes. Luckily when I was struck by one of these heaters gone haywire my controller put a stop to the boiling intent of the heater. Additionally this extended the life of my heater. How is that possible? When my heater became a “stuck on” the aquarium heater controller allowed me to continue using it anyways by shutting of the heaters power when the correct temperature was reached. Combining the heater controller with the Hydor creates a powerful heating duo that can support your tank for well over 5 years.
Avoiding Clogs
Our biggest fears when plumbing is involved are leaks and clogs. The heater itself cannot prevent leaks and will not create any leaks on its own. This leaves us only with the fear of clogs. Unlike clear tubing we cannot see what is inside the Hydor inline aquarium heater. For this reason it is strongly recommended you refrain from placing the heater on the intake tube of your system. Once the water passes through your filter, sump, or refugium it is far less likely to carry any debris. This allows for a safe return with almost no chance for clogs. Should anything manage to get through and into your heater you will quickly notice a decrease in water flow. The reduced chance of passing debris means the clog will only throttle the water speed and not fully shut it before you can fix the problem. I cannot stress it enough, use this heater on the return line only!
Warranty
I was quite blunt with this earlier, yet I know how much we need verification on something like warranty. In addition to amazons own 30 day warranty on every object, Hydor themselves covers any replacement or repair costs for two whole years. Should the heater brake multiple times or you decide the heater is just not right for you after it does break they are more than happy to issue a refund rather than a return. They give amazing customer service with no fear of loop holes or replacement rejection.
Lifetime
Ok so we know that the heater can be replaced for two long years. Now what good is that if the heater is constantly breaking down and being sent in? To be considered the best inline aquarium heater Hydors quality comes into question. For this piece of equipment the reviews have always been top notch. It would be absurd to base this only upon my never broken inline heater. Thankfully those who have used the Hydor have spoken out and shown that the average life time of this heater can last well over 3 years, some even reaching into the 12 year mark. More than impressive as heaters are constantly switching on and off.
For those wondering if the salt in marine tanks could wear down the heater Hydor has pulled through again.

Keeping salt degradation in mind the heater comes built with a glass tube for the water to pass over. This prevents any of the wear that metal or plastic items receive via constant salt interaction.
Heating Strength
While I cannot simply tell you to disregard the rules of normal heating requirements, I must say this heater seems to be far more effective at its job than normal tube heaters. In many cases a single 300 watt inline aquarium heater is able to keep a 100+ gallon tank heated up. This occasionally happens with some of the best aquarium heaters but is not common place. This means the Hydor inline aquarium heater is easily most cost effective than normal tube heaters and can even cost less than normal heaters. With most heaters you will end up needed multiple sticks to heat large bodies of water. The inline heater however will get the job done with just the one in most cases. If you keep your house especially cold however then you may still need a second heating element. This has never been the case in my time with the Hydor however.
Overall
The Hydor Inline Aquarium Heater offers an amazing amount of value for something as simple as a heater. The life time is often over three years with a two year warranty. It can heat tanks of a much larger size than normal stick heaters while staying at a low power cost. Combined with the fact this inline aquarium heater can replace two stick heaters it often saves money in the long run. Installations is simple but must be done with care. Plumbing is no joke and leaks can cause serious damage if done carelessly. Once installed correctly the design of a glass interior and shock resistant exterior prevents all damage. Unless you attack this heater it isn’t going anywhere. As my final note I want to remind everyone to always position inline aquarium heaters upright. Sideways and upside down can trap air bubbles and fry your fish due to incorrect temperature readings. If you’ve managed to read this far it’s likely that the inline aquarium heater suits your needs. Don’t hesitate to check one out as their lifetime and efficiency will easily surpass a traditional stick heater when used correctly.


Thank you for this excellent review of the Hydor inline aquarium heater. I have a 200 gallon tank, 72x24x27 and 2 Fluval FX6s canister filters. After reading many reviews, this one has convinced me to give them a try. I’ll put 1 each 300w inline Hydor heater with each FX6 filter. My average house temperature is about 72F, so hopefully this will keep the tank to the right temperature, about 78-80F degrees.😊